
Intro
This is a short guide to get going with Rust and Godot 3.2. This is written with Linux in mind but most of the knowledge should be transferable to MacOS and Windows.
Prerequisites:
- Godot 3.2
- Rust (at the time of writing version 1.41 was used)
Step 1: setting up a new Rust project
Create a new rust project: cargo new --lib mygame.
Open Cargo.toml and add the [lib] section:
[lib]
crate-type = ["cdylib"]
and update the [dependencies] section to include gdnative:
[dependencies]
gdnative = "0.9.0"
Step 2: hello world (in Rust)
Open src/lib.rs and add the following code:
|
|
Run cargo build and you should have a lib<projectname>.so file in
target/debug/ (where <projectname> is the name of your project)
This file should be copied / moved into your Godot project once that’s crated.
.dylib and not
.so, and on Windows it’s .dll.
Step 3: create a new Godot project
Create a new Godot project and copy the lib<projectname>.so file into your new
Godot project.
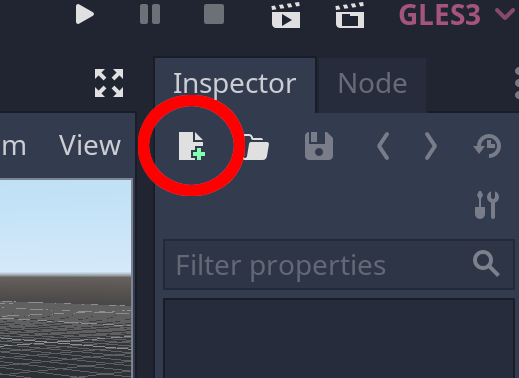
Add a GDNativeLibrary by pressing the “new” button in the inspector:
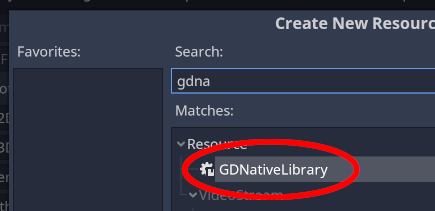
Select GDNativeLibrary:
Select the directory icon to load your dynamic library (your .so file on
Linux).

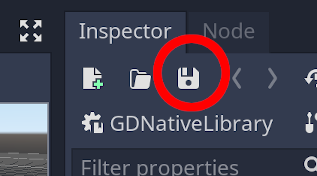
Once the library is selected, save the GDNativeLibrary, as it is not saved
when you save the scene, and make sure the file extension is .gdnlib (it will
default to .tres).
Step 4: using your library
This is the final step. Once you have created (and saved!) your GDNativeLibrary
you can finally add a node and attach your HelloWorld struct to it.
Create a new node of type Node.
If you copied the code from step 4 into lib.rs you may have noticed the
use of Node as the owner type, as well as in #[inherit(gdnative::Node)].
#[derive(gdnative::NativeClass)]
#[inherit(gdnative::Node)]
struct HelloWorld;
If you want to use another node type, e.g Spatial or Sprite, replace
Node with the new node type.
Attach a new script to the node. In the “Language” section change from “GDScript” to “NativeScript”, and enter “HelloWorld” in the class name (this should be the name of your struct).

Click “Create”.
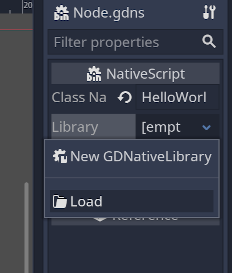
Finally you need to load the gdnlib file from step 5. Select the “Library”
drop-down (currently reading [empty]), select “Load” and finally select your
gdnlib file.
If you run the project with F6 (or press “Play Scene”) you should see “hello, world.” in the Godot output console.
Final notes
It will help with figuring out how most things work by combining the gdnative
documentation (run cargo doc --open from your rust project) with the Godot
documentation: https://docs.godotengine.org/en/stable/index.html, e.g seeing the
call signature in Rust docs, and the default values in the Godot documentation.
If you want to see stack traces in the event of a panic and you are building for
release, add the following to your Cargo.toml file:
[profile.release]
debug = True